<==| Home |==]--+
Devlog 001 - First Steps
Today's Goals
- Custom Character
- Simple Mesh
- Movement
- Crouch / Prone
- Animations
- Idle
- Forward
- Animations
- Run
- Crouch / Prone
- Camera
- Rotate
- Tilt a bit
- Zoom
What I Did
Custom Character
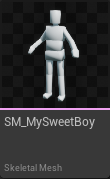
Made a derpy dude and rigged him to the UE5 Quinn Mannequin.
I'm getting skeleton errors but it works fine, it's probably a scaling thing.
Hopefully he enjoys his new life here and the errors aren't causing him discomfort.
Movement
I changed the default WASD to follow the camera rotation, I don't remember if it was necessary but it feels cleaner so.. (I should really write this while I'm doing it instead of afterwards)
Also set up some Inputs with the Enhanced Input System
I followed this video and made an Enumerator with the different Mobility States; Standing, Crouching and Crawling.
Then in the Player Controller, using a Select Node you can choose a new state depending on the state you're already in, and then with another you can set what speed to move.
It's the same set-up for crouching and crawling, super easy.
Running is similar but I used a Switch instead of a Select, and if they are standing then he can run and it changes his speed. I was thinking I might do something with running in other states but I might change it.
It's a Hold to Run thing (Stamina to come oh boy), so Started he runs and Completed it switches back to walking
Animations
I got some Crouching and Crawling animations from Mixamo, and retargeted them to our skeleton.
Animation BP and Blendspaces
Created simple Blendspaces for the Crouching and Prone animations, made a new animation blueprint (ABP_Human).
I copied over everything from Manny's ABP, except for the control rig part because of skel errors.
In the ABP_Human
Cast the MobilityState from the BP_PC to set the MobilityState of the AnimBP in the Event Graph
Added Crouching and Prone States to the Locomotion StateMachine, and linked them up based on what MobilityState he is in.
Camera
Rotation
Here I got the Mouse Input XY and inverted the Y axis.
Multiply that by CameraRotationMultiplier which decides how fast the SpringArm(and Camera) will rotate around the player
Then we just add that to the current Rotation of the SpringArm to get a new value, and add a clamp to the Y so it stay's more or less top-down.
Lastly we take the new Rotation value and set it as our SpringArm's Rotation.
Zoom
The Zoom is a little more work because I like the Idea of having pre-determined zoom levels.
First we figure out if the scroll wheel is going up or down by comparing the value to 0.
If it's higher, +1 to the Zoom Level, clamped at 3
If it's lower, -1 to the Zoom Level, clamped at -3
Then take that and set it as the current CameraZoomLevel
Once we've got our new Zoom Level we can multiply it by the CameraZoomDifference, which is how much it zooms between levels.
This gives us how far we should be from the original distance. Subtracting that from the default SpringArm length gives us our offset.
then just lerp between the spring arm length we're at now and the result we just got and the camera moves smoothly to the new distance.
Character Blueprint (BP_PC)
BP_PC: EventGraph (Camera Control Graph)
BP_PC: EventGraph (Movement Control Graph)
ABP_Human: AnimationBP
Refs
Metal Gear Solid 3 Stealth System | Two Minute Tutorials | Unreal Engine 4 by Yahya Danboos
